

These butterflies are my latest butterfly sticker design that I call Prairie Butterflies. I currently offer them in my Etsy shop in various paper colors. I’m releasing the DIY files so those of you with cutting machines can make them yourselves. This tutorial is on how to tea-stain these butterflies and if you want to make these in colored paper you can still follow along.
Tea-staining creates a beautiful, weathered effect that has a vintage look. Each butterfly you stain ends up being one-of-a-kind because the tea stains settle differently every time. Check out my DIY tea-stained dragonflies if you want to see more examples of tea-staining.
This is a great project for kids because tea-staining is so forgiving. You really can’t ruin the look no matter how those little hands decide to paint each butterfly! You can use these butterflies to create other things like this wreath I created with a hoop I found at Michael’s and some dry grass and wire:


And here they are as wall stickers:


So pretty right? I haven’t yet decided if I’ll be offering this tea-stained version of these butterflies in my Etsy shop. They take some time to make and I’m hoping to spend less time on filling orders and more time on creating new designs. But I do love them and I have a feeling other people will too so I may just bite the dust and offer them. Stay tuned!
If you’re here looking to make these yourself, keep reading and I’ll take you through the tea-staining step-by-step. Also, have a look at the following images to see what these butterflies look like in colored paper. Still just as beautiful and they can be made to match your color scheme.


Tea-Staining Tutorial:
Materials:
Prairie Butterfly Stickers SVG bundle
Cutting Machine
White Cardstock Paper
Double Sided Tape with Lining
X-acto knife or any sharp point
Scissors
Small Paint Brush
Tea bag (Orange Pekoe, any brand)
Boiling Water
Sticky Putty or mounting tape (for adhering to walls)
I recommend getting all your butterflies cut before you tea stain them. This way you won’t end up having to make the tea more than once.
Step 1: Cut your butterflies
Cut out all the butterflies. There should be 3 butterflies, each with two parts. The top row in the image below are the parts you will be tea-staining.

Regarding the wing fold lines: each butterfly will be cut with the dotted fold lines, as you can see in the image below. If you prefer to create score lines for your butterflies you can ungroup each butterfly and remove the dotted lines before cutting. You can see in the image below what the butterflies will look like with the dotted lines versus with scored fold lines. You can create score lines with a bone folder or even with a knitting needle or butter knife and a ruler. Just make sure you’re using the smooth side of the butter knife.
As you can see, the tea makes the dotted lines darker. Not a huge deal but some people may prefer a more conspicuous fold line.

Step 2: Brush tea onto top butterflies
Once you have all your butterflies cut, boil some water to make your tea. I used a Red Rose Orange Pekoe tea bag. I added only about a quarter cup of water to get a concentrated color. You only need to steep the tea bag for a few seconds. Press all the water out with a spoon to get more tea color out of it, or you can also leave the tea bag in there while you stain your butterflies, as I did.
Then with your paint brush, brush the tea lightly onto the butterflies. If you miss any spots, don’t worry because you can catch it when you do your second round of staining. Below is what the butterflies look like after one staining.


Allow the butterflies to dry for about 20 minutes, then apply the second staining. You can apply the tea in splotches, or you can apply it more uniformly. I like a messy, uneven look so I did it in random splotches. I do two layers of staining but you can experiment with how dark you want your staining to be.

And this is how they look when dry:

You’ll notice that as your butterflies dry, the wings will curl up at the ends. Just uncurl them with your fingers if you want them to lay more flat.


Step 3: Apply tape to butterflies
After your butterflies have dried, cut out a small piece of double-sided tape and stick it onto the spines of the unstained butterfly pieces EXCEPT for Butterfly 3, as you can see in the images below.
With Butterfly 3, the stained piece is larger than the back unstained piece, and you’ll see when you go to stick them together that it’s easier to put the tape on the larger stained piece. If you’re making these in colored paper you can also follow along with these same steps. For Butterfly 3, turn the stained piece over and stick the tape onto the butterfly spine.


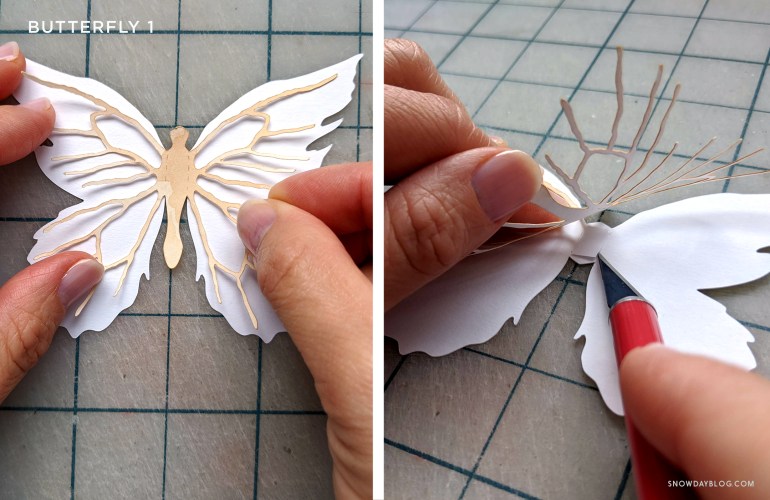
Step 4: Assemble butterflies
Butterflies 1 and 2 are assembled the same way, with the tea-stained pieces on top like below. Position your stained piece on top of the bottom piece so that it’s centered. When you have them aligned, hold down one side with your hand and pry open the top piece to reveal the tape underneath (right side of images below). Then with an x-acto knife or any sharp object, reach in and remove the tape lining. Press the top piece down firmly to stick.

For Butterfly 3, center the unstained piece onto the stained piece like on the left side of the image below. As with the other butterflies, while holding it down in place on one side, pry open the unstained piece to reveal the tape below and remove the lining.

Step 5: Fold Wings
Fold each butterfly wing by placing your thumbnail in the fold line and then folding up with your other hand.

That’s it! To stick these butterflies to your walls, you can use sticky putty or any mounting tape. I like to use 3M removable mounting tabs.
When finished your butterflies will look like this:


If you make these beautiful butterflies please remember to share your images and tag @chaivdesign on Instagram!


