

This DIY butterfly decoration is perfect for your butterfly themed birthday party. Hang these paper butterflies around a wedding reception to create an enchanting forest of swirling butterflies or hang them over a dinner table to create an eye-catching centerpiece.
You can design your own butterfly or purchase an SVG file of the butterfly shown in this tutorial from our SVG Files Shop.
If you’re thinking of adding a butterfly mobile to your nursery, try making these instead. They’re much easier and just as pretty!
✻✻✻ Disclosure: Some of the links below are affiliate links, meaning, at no additional cost to you, I will earn a commission if you click through and make a purchase. I am trying to avoid having ads on my site so if it’s a product you were planning on purchasing anyway, please consider purchasing through my links. I really appreciate your support❤️ ✻✻✻
Materials:
Cutting Machine
Cardstock Paper
Bone Folder Tool
Ruler
Double Sided Tape with Lining
Hole Puncher
Clear String

Step 1: Cut butterflies
Cut two butterflies out with a cutting machine or by hand. You will get a smoother cut with a machine, but hand-cutting will be fine too. You will need two of the same butterfly design for each hanging butterfly.

Step 2: Create fold lines for butterfly wings
❋❋❋❋❋❋❋❋❋❋❋❋❋❋❋❋❋❋
UPDATE OCTOBER 2020: I have included dotted cut lines on the butterfly in the SVG file so there is no need to create your own fold lines for the wings. Your machine will cut these dotted lines and they will allow you to fold the butterfly wings.
❋❋❋❋❋❋❋❋❋❋❋❋❋❋❋❋❋❋
Create a fold line in each butterfly wing. I use a bone folder tool but you can use anything here, even a butter knife works well. If you are using my butterfly design it should be obvious where to create the fold lines, basically where the wings meet the butterfly’s body. If you are designing your own butterfly just make sure the points where the wings meet the body is obvious.

You should have four fold lines in total, two on each butterfly.

Step 3: Apply tape to one butterfly
Take one butterfly and flip it over to the side opposite of where the fold lines are. Put a piece of tape along the body of the butterfly, between the two fold lines. Even though you’ve flipped your butterfly over, you should be able to see the dents of the fold lines. I use double-sided tape with lining on one side. Make sure the tape width is smaller than the width between the fold lines so the wings don’t end up taped together.

Step 4: Align and tape down second butterfly
Place the second butterfly (fold lines facing upward) on top of the first butterfly. Align them to match.

Once butterflies are aligned, hold the top left section down with one hand (top right if you are left-handed) and lift up the top butterfly to reveal the tape in between. Remove the tape lining. I like to use my x-acto knife to reach in and lift the lining. Make sure not to shift the top butterfly when doing this. You want to keep them aligned. Press down top butterfly.

Step 5: Punch hole in butterfly head
If you are using my butterfly SVG file, you will see the hole in the butterfly head included in the file. It’s a little bigger than the hole you see here because I find my cutting machine catches if the hole is too small.
When I make these for customers I use a Japanese hole puncher to create the hole because I like a smaller hole, as you see below. If you don’t have one of these, you can use any hole puncher. I like the Japanese hole punchers because you can choose different hole sizes. Of course you can also let your cutting machine create this hole.

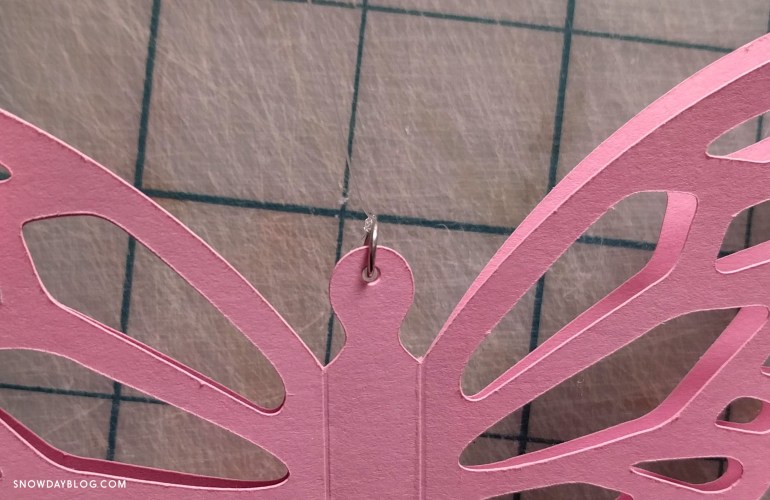
Step 6: Tie string to butterfly head
For the butterflies I make for my customers, I attach metal ringlets to the butterflies then tie the string to the metal ring. It makes them look a little more elegant. You can skip the metal ringlets and simply tie your string through the hole.
Step 7: Open the wings
Open up all four wings as wide as you like.

Hang and enjoy!

However you hang these butterflies, please share your images and tag us on instagram @chaivdesign. We love to see them!
