

Woodland Christmas Trees are one of my favorite paper crafts to make, and now they’re a beloved part of my Christmas décor. You can create an entire grove of these layered paper trees using the SVG files in my Woodland Christmas Trees bundle. They look magnificent grouped together on a mantel, a windowsill, or styled as a holiday centerpiece—and the more trees, the better.
These 3D paper trees were originally designed as standalone décor, but they now pair beautifully with my 3D Paper Christmas Village houses and church. If you’ve already made the Village (or are thinking about it), these trees complete the scene and instantly turn it into a magical winter forest.
Woodland décor is incredibly popular right now, and these trees work year-round. Make them in classic white for a snowy winter look, try warm fall colors for a cozy autumn display, or use soft neutrals for a child’s nursery or reading nook. They aren’t overtly Christmassy, so you can leave them up long after the holidays.
If you look closely, each tree is constructed from a single leaf design—glued one at a time onto a cone. (If you follow my Instagram, @chaivdesign, you might recognize this leaf from a rejected snowflake design from 2018.) Yes, gluing hundreds of leaves can be repetitive, but it’s wonderfully meditative. I watched a lot of Golden Girls while making mine.
If your family loves crafting together, think of these as an updated take on the classic homemade garland tradition. My tutorial uses hot glue, but white glue works too and makes this kid-friendly. Their leaves might go on a little wonky, but that’s part of the charm—and they’ll proudly point out which one they made.
You can get the Woodland Christmas Trees SVG set using the link below, and then scroll down for my full video and step-by-step photo tutorials.

🛍 Get the Christmas Woodland Trees SVG files here
• Etsy — Christmas Woodland Trees
• Blog Shop — Christmas Woodland Trees
(Same files, two places to shop. Choose whichever is most convenient.)
✂️ Jump to video tutorial
• Christmas Woodland Trees Video Tutorial
✂️ Jump to photo tutorial
• Christmas Woodland Trees Photo Tutorial
✨ Came from Etsy? Return to the listing here:
🌲 Pair With the 3D Paper Christmas Village
These Woodland Christmas Trees are part of my 3D Paper Christmas Village ecosystem and are scaled to match the houses, shops, and Cathedral. If you’d like to build the complete Village, start here:
Different Colors and Styling Ideas
These Woodland Christmas Trees take on a whole new personality depending on the colors you choose—mix and match shades to suit any season, room, or holiday theme.


Inside the Woodland Christmas Trees SVG set, you’ll find three cone templates (small, medium, and large) along with matching leaf sizes. I’ve also included “Nestled” files—these arrange multiple leaves on a single 8.5″ × 11″ sheet, so you can cut batches at once and speed up assembly.
UPDATE 2021: In 2021, I added a bonus folder called CHAIV TREE TOPS, which features redesigned, one-piece tops for all three tree sizes. If you purchased the files before this update, you can re-download your order on Etsy or contact me at chaivdesign@gmail.com and I’ll send you the updated folder.

Below, you’ll find the full video tutorial, followed by the original step-by-step photo instructions if you prefer working at your own pace.
✻✻✻ Disclosure: Some of the links below are affiliate links, meaning at no additional cost to you, I will earn a commission if you click through and make a purchase. I’m trying to avoid having ads on my site so if it’s a product you were planning on purchasing anyway, please consider purchasing through my links. I really appreciate your support ! ✻✻✻
Materials:
Woodland Christmas Trees SVG
Cutting Machine
Printer
Text Weight and Card Stock Paper
Scotch Tape
Hot Glue Gun
End of Small Paint Brush
Christmas Woodland Trees Video:
Christmas Woodland Trees Photo Tutorial
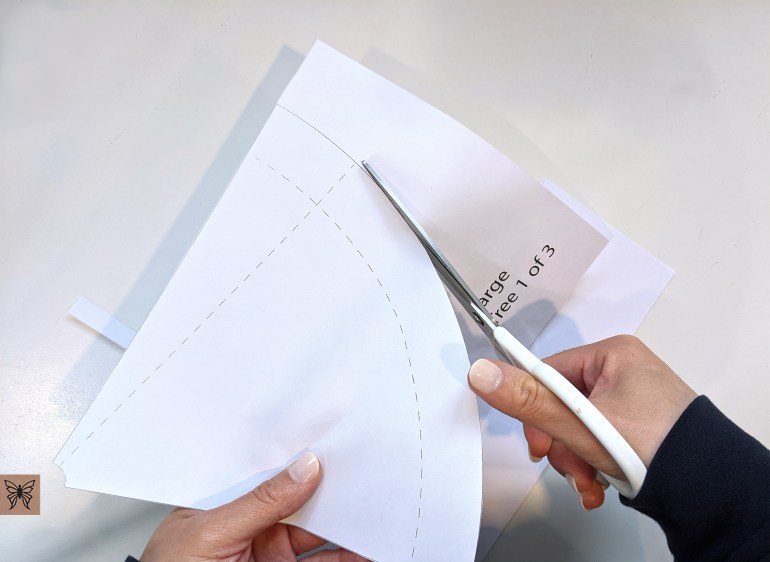
Step 1: Print and hand cut your cone templates
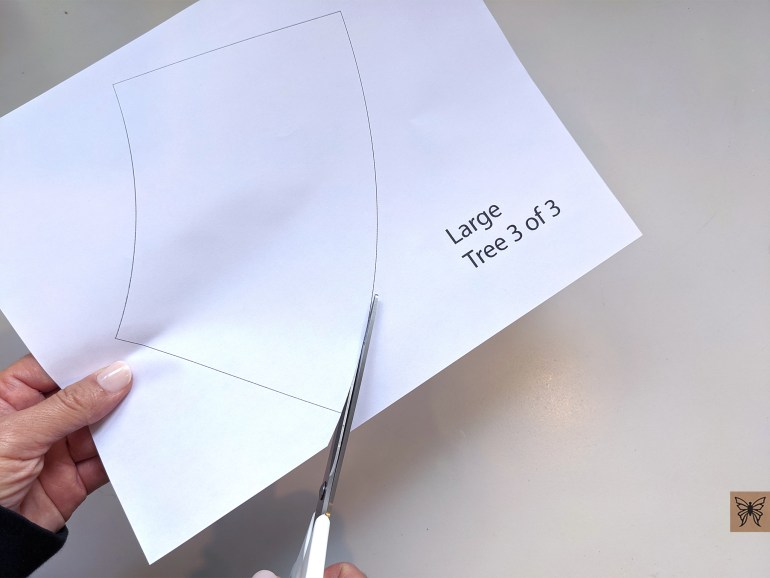
Your file will contain 3 cone sizes: small (5.5 inches), medium (7.5 inches) and large (11 inches). Use the PDF files in your download to print out your cone templates and cut them out by hand. For this tutorial I’ll show you how to assemble the large cone since it has 3 parts to it, and the first few steps will cover how to create the small and medium cones.

If you’re making the small or medium cone, the next two steps are what you’ll be following.
Step 2: Create cone shape
For this step, it will help to get some tape ready. I like to place my tape on the edge of my table. You’ll need 4 or 5 pieces for the small and medium cones and about 10 to 12 pieces for the large cone.

Start by curling your cone into shape. The dotted line that runs vertically on your cone is your guide for where you’ll line up the other edge of the cone. Try to line it up all the way to the tip. More importantly, make sure the bottom edges are aligned, because this will help your cone to sit flat.
I’m using text weight paper in these images but if you’re using a heavier paper you may have more trouble getting the tip to curl in. Curl the tip end of the cone with a fingernail to get the tight curl. Also if you’re using heavier paper you may need to use hot glue instead of tape. Don’t worry too much if your tip isn’t perfect because you can cover it with the leaves later on.

Step 3: Tape cone
Take a piece of tape and place it on the flap at the top of your cone, then use the tape to pull the flap over to meet the dotted line.


Now tape the rest of the cone edge. If the bottom of your cone is not aligned, trim off the part that is sticking out so that the bottom of your cone is smooth.

If you’re making the small or medium cones, you’re done and you can scroll down to Step 6 to create the rest of your tree. Continue to the next step to finish making your large cone.
Step 4: Assemble parts 2 and 3 of large cone
Take Part 3 of your large cone and align it’s left edge along the dotted line on top of Part 2. Make sure the curve of both pieces are aligned. When you have them aligned, tape them together.


Step 5: Attach bottom of large cone
Now take the new piece you’ve just created with Parts 2 and 3 and tape it to your cone, following the dotted line along the bottom of the cone. I find it helpful if you first place a piece of tape on the area (of the bottom piece) you’re about to tape down. Don’t worry about matching the vertical seams of the cone and the bottom piece (see image below) since you’ll be covering the whole cone with leaves.

When you get to the end, you may have two flaps like I do below, or you may just have one flap to tape down. Finish your cone by taping the ends together.


Now your large cone is ready to become a tree! Below are the three cone sizes that are included in my tree download.

Step 6: Cut tree tops
In your folder titled “Chaiv Tree Tops”, you’ll find the SVG file which contains three tree top sizes like below. Cut one tree top for each tree you’re making. Make sure the white fold lines in each tree top are dotted. If they are showing up in your software as solid lines, change them to dotted lines before cutting.
After cutting your tree top, fold the three fold lines downwards.

Here’s a quick video on how to assemble your tree top. I’m using hot glue but you can use double sided tape or white glue. For the small size tree top these may be better options since hot glue can be clumpy.
Now attach your tree top to the top of your cone with some hot glue. Try to center and place it on as straight as you can. Set aside until you have all your leaves cut.

Step 7: Cut leaves
In your file you’ll notice I have files with “Nestled” in their names. I’ve taken each leaf size and nested them together into rows that will fit on 8.5″ x 11″ paper. Below is the number of pages of leaves you’ll need to cut for each tree size. I don’t have exact leaf numbers counted for each tree so if you follow my guide below you should have extra leaves left over.
Small Tree – 2 pages
Medium Tree – 3 pages
Large Tree – 7 pages
For these final steps, I’ll be making a medium sized tree. I use a brown cone only because it looks better with green leaves. Feel free to use any color you like but if you’re making a white tree I recommend using white cones.
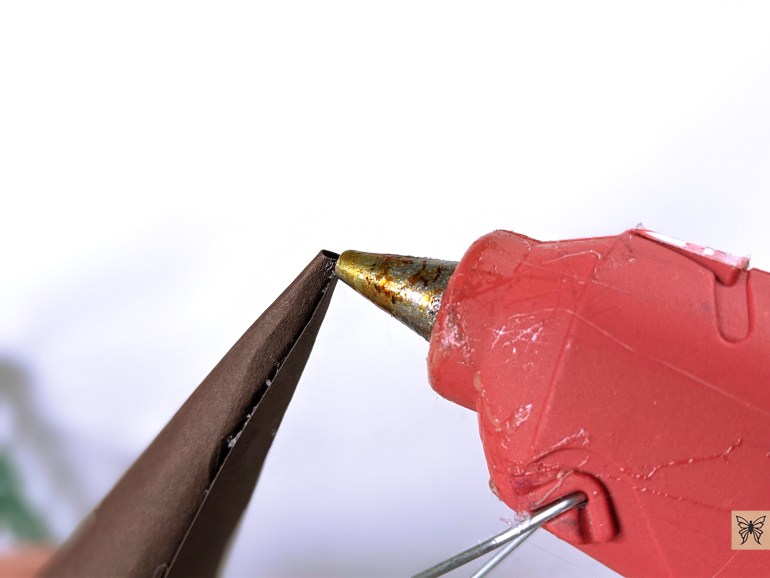
Prepare your leaves by bending the ends of each leaf. Place the leaf end between your thumb and forefinger and gently bed upwards to get a slight angle.


Step 8: Glue leaves onto cone
Place a dab of hot glue on the back of the bend of one leaf, and attach it to your cone, starting underneath your tree top. Nestle it directly beneath and between the two leaves in the tree top piece above it. Continue filling the space underneath your tree top piece with more leaves and work your way down the cone.


Here’s what the top four rows of leaves will look like:

As you move down the cone, you’ll see that the leaves won’t nestle perfectly into each other because there’s more space on the cone. At this point you can start leaving some space between each leaf like in the image below.

You can use the end of a paint brush or any thin tip to reach in and press each leaf down as you glue them.

Continue gluing leaves on until the tips of your leaves start to reach the bottom of your cone.

There will be space left at the bottom of your cone which you can just leave empty. Now just set your tree down and fill in any gaps along the bottom that you think need to be filled in.

Your tree is done! You can fluff up or press down any leaves that look out of place.


I hope you enjoy making your trees! Questions? Email me at chaivdesign@gmail.com. Feel free to send me photos of your trees or if you post on social media my Instagram is @chaivdesign and Facebook page is Chaiv.
Your ideas are simply wonderful and your directions are easy to follow. Thank you for sharing!
Thank you so much Marilyn! I really appreciate your support❤️ Vin
I love these trees so much! 💞
Thank you Carol!
How do you cut out the doily part of the leaves?
Hi Sharon, These trees were designed to be cut on cutting machines like the Cricut or Silhouette. Vin
Oh my goodness, these are beautiful! Instructions are detailed and simple to follow. Unfortunately, I do not have a Cricut or Silhouette.
Thank you so much Ola! Feel free to send me a message directly to my email, chaivdesign@gmail.com. I might be able to help you out😄
Hi Vin. What density paper did you use for cardstock leaves? Thanks
Hi Maria. I use 60lb or 65lb (162gsm or 176gsm) paper for all my projects. You can use 80lb as well but I wouldn’t go any heavier than that.
Just beautiful, Vin!
Thank you Laura!
I am preparing to make these with my mom. Is there a reason you start from the top and not the bottom?
Hi Lauren. I only started at the top because I wanted to make sure the leaves were laid out nicely up there. I thought if I started at the bottom, by the time I hit the top the spacing might be wonky. But I have had customers tell me they start at the bottom and it works out fine so just do whatever you think is best. The leaves of these trees are very forgiving for mistakes so I think it’ll be fine even if the spacing isn’t perfect. Thank you for your support, I hope you and your mom have fun making these!
These are great but I’m still wondering how to cut them out… I have Cricuts that slice strait lines but none that could cut those shapes.
Thank you Lindsey! Your Cricut can cut any design, you just need to upload the design to Design Space, usually in the form of an SVG file. When you purchase designs made for cutting machines, such as these trees, you receive the design files required to use with your Cricut.